Tuesday, March 27, 2012

Pioneer Woman's Breakfast for Dinner

Sausage Pancakes on a Stick, Smiley Fries, and Purple Monster Smoothies


My 8 year old has been looking forward to having this dinner we saw on an episode of The Pioneer Woman  since we watched it two weeks ago!  I think it just might be the highlight of her Spring Break Week.   Along with being our resident Cereal Monster, she's also our Sausage Monster, so she couldn't wait to try these Sausage Pancakes on a Stick.    

Let's just say, Ree Drummond did not disappoint!  These Sausage Pancakes on a Stick were yummy, yummy, yummy!  The 8 year old ate 4 of them!  What's not to like about a food you eat on a stick and dip in syrup?  This was the first time I have ever fried anything in a pot of oil.  I try to cook a little more healthy, but these certainly were good for a special treat. 

I cheated a bit from The Pioneer Woman's menu and purchased smiley face fries from McCain's.  They are similar to the ones they serve at Bob Evans on the Kids' Menu.  However, I just baked them instead of frying them in the oil.  They, too, were a treat kind of food for my kiddos.  I don't own a ricer, so I wasn't sure if I wanted to experiment making the homemade tater tots this night.  Maybe next time!

We have smoothies regularly around our house.  Usually I whip up just one or two at a time using our Magic Bullet Smoothie maker, but because I was making a large batch of the Purple Monster Smoothies, I went ahead and used the blender.  I altered Ree's recipe slightly by using two bananas and a few more strawberries instead of purple grapes because we did not have any in the frig (and they were not on sale during my last shopping trip).  I also used strawberry yogurt instead of vanilla or plain only because that's all we had.  They still were very purple and packed with taste and vitamins.  We slurped them through colored bendy straws for fun!

Here are the recipes:

Sausage Pancakes on a Stick
1 Pkg breakfast sausage links, browned and drained (I used Johnsonville)
3 cups pancake mix
1 cup yellow cornmeal
sprinkle of cinnamon
1 egg, slightly beaten
1/2 tsp vanilla
3 cups water
canola oil, for frying
pancake syrup, for dipping

1.  In a large bowl, combine the pancake mix, cornmeal and cinnamon and mix together.
2.  Add egg, vanilla, and 1 cup of water and mix. 
3.  Continue to add water until batter is thick but not too thick.
4.  Heat some canola oil in a large pot over medium high heat until it's about 350 degrees.
5.  Place a wooden skewer or chopstick about 2/3 through each cooked sausage link.
6.  Dip the sausage into the batter.
7.  Carefully drop the battered sausage into the hot oil and cook 2-3 minutes, turning to brown on all sides.
8.  Drain excess grease on paper towels.
9.  Serve with warm pancake syrup for dipping.

Purple Monster Smoothies
2 large bananas
2 cups of frozen blueberries
1 cup of frozen strawberries
1 cup of greek yogurt
1 cup milk
1-2 Tbsp honey

1.  Place all ingredients in a blender.
2.  Blend until smooth.
3.  Pour into serving glasses.

What's your favorite Breakfast for Dinner?

Monday, March 26, 2012

Ham and Cheese Morning Muffins

I'm always on the lookout for new breakfast items!  I like recipes that can be made ahead and then frozen so that I can have something to grab and go on busy mornings (which are most of the mornings around here).   I like to have a little protein with breakfast, and I prefer something savory rather than sweet.  My oldest and youngest both have tastes similar to mine.  In fact, I think they both would pick leftover pizza for breakfast over a sweet bowl of cereal any day! 

I first came across this recipe for Ham and Cheese Morning Muffins while looking through the 2011 Back to School Issue of Family Fun magazine.  I pulled out this recipe thinking it looked like something that we might enjoy.  I made the first batch of these muffins according to the recipe back in January, but I felt they needed a little tweaking before I could call them a family favorite. 

In less than 15 minutes, I made a new batch today, and I can say they've moved into that category.  The girls have a playdate this afternoon, and they all grabbed a muffin from the cooling rack and headed down to the basement saying, "Oooh!  I like these!" on the way down.  I made them using some leftover ham and cheese I found in the deli drawer (from a recipe last week) when I cleaned out the frig this morning.  I plan to freeze the remaining muffins in a ziploc bag and pull one or two out at a time as we need them.  Just 30-45 seconds in the microwave, and we'll have a hearty grab and go breakfast ready to enjoy.

Here's the recipe:

Ham and Cheese Morning Muffins
1 3/4 cup flour
3/4 cup yellow cornmeal
1/4 cup sugar
2 tsp baking powder
1/2 tsp baking soda
1/2 tsp salt
1/8 tsp onion powder
a few shakes of pepper
1 cup milk
2 eggs
1/3 cup oil
1 cup diced ham
1 cup cheddar cheese

1.  Mix all dry ingredients in a large bowl with a whisk.
2.  Mix milk, egg, and oil in a separate small bowl with a whisk.
3.  Whisk the wet ingredients into the dry just until mixed.
4.  Fold in the ham and cheese.
5.  Spoon batter into 12 greased muffin cups.
6.  Bake for 20 minutes at 375 until tops are lightly browned.

These freeze really well!  Just let them cool completely before you put them in a ziploc bag.

To reheat, pull a muffin from the bag in the freezer and microwave 30-45 seconds.  The cheese gets all melty and gooey.  Eat plain or add a bit of sweet cream butter to make them even more delicious.

Ham and Cheese Morning Muffins


What's your favorite savory muffin?

Fluffy Orange Salad

I posted my Fluffy Green Salad last week, so it's only natural that I post our other favorite, Fluffy Orange Salad, this week.  I think I need to work on coming up with more creative names for my recipes!   I don't have a picture for this one, but just picture a bowl or orange fluffy goodness and that's sort of what it looks like.

We first had this Fluffy Orange Salad after the birth of my youngest daughter.  Our wonderful neighbor, Brenda, brought us dinner including a container of this wonderful Fluffy Orange Salad.  As we ate spoonful after spoonful, we all tried to guess just what was in this delicious dish.  It tasted like a melted creamsicle.  I asked Brenda to share her recipe, and she did, so now I'm no sharing it with you.  Since then, Fluffy Orange Salad makes a regular appearance on our weekly menu.  I've tried to lighten up the original version a bit using sugar free and fat free products, and the results are favorable.  I've served it to many guests young and old, and they all think it's heavenly.  I hope you do, too.

Here's the recipe:

Fluffy Orange Salad
3 cups water
1 sm pkg orange sugar free jello
1 sm pkg instant vanilla pudding
1 sm pkg cook and serve tapioca pudding
1 lg can mandarin oranges, drained
1 sm can crushed pineapple, drained
1 tub of Light Cool Whip

1.  In a sauce pan, bring water to a boil.
2.  Whisk in the jello and pudding mixes.
3.  Boil for 1 min.
4.  Remove from heat and let cool on counter.
5.  Fold in pineapple and oranges and cool whip being careful not to break up the oranges too much.
6.  Spoon into a serving bowl.
7.  Cover and refrigerate at least 2 hours or overnight.

What's your favorite recipe you've ever received from a neighbor?

Frozen Fruit Cups

Pioneer Woman hosted a Kid Swap Sleepover a few weeks ago on her show.  Her girls spent the night at her friend's house while she hosted her own boys and her friend's boys at her house for the night.  To make things extra fun, she decided to have breakfast for dinner and dinner for breakfast.   My kids LOVE having breakfast for dinner, so we all tuned in to watch her show and see just what she would make at the ranch.

One of the recipes she shared was Frozen Fruit Cups.  She explained that she had been given the recipe years ago by her homeschooling friends and that it was a great way for her kids to eat fruit.  I had been given a similar Frozen Fruit Cups recipe by some women from Upper Arlington Lutheran Church in a Women of Titus 2 Class I took years ago.  The recipes were similar, so I took both recipes and sort of created a new version.  The result was a hit with my family.  These frozen fruit cups were well received last week during our March heatwave when temperatures in Columbus reached 89 degrees!  They were sweet, tart, slightly slushy, and very refreshing!  I think they'll be making a regular appearance on our snack or breakfast choices menu during the summer months.

Frozen Fruit Cups
Sweet, Tart, Slightly Slushy, and Very Refreshing!

What I like most about this recipe is that you can spend a few minutes making a huge batch (18 cups) that will last for several meals or snacks.  I also love that you can make this in individual servings so you can take out just as much as you need.  About the only trick to making this recipe be a success is to use FIRM bananas, not green, but no brown on the skins.  I think you could probably use whatever fruits you like and it would turn out fine.  My kids pick out the cherries from Fruit Cocktail to eat them first, so rather than a whole can of fruit cocktail as The Pioneer Woman suggested, I just put in a jar of cherries.  I think next time I might try adding frozen blueberries or raspberries from my freezer stash.

Here's the recipe:

Frozen Fruit Cups
4 cups frozen peaches, thawed slightly and diced
1 or 2 lg can(s) crushed pineapple, drained
2 lg cans mandarin oranges, drained
1 small jar maraschino cherries, drained and halved
5-6 firm bananas, diced
1 small can of orange pineapple juice, thawed
1/3 cup lemon juice

1.  In a large bowl, combine the peaches, pineapple, oranges, and maraschino cherries.
2.  Add the bananas.
3.  Pour the thawed orange pineapple juice concentrate and the lemon juice over the fruits and stir gently to combine.
4.  Using a ladle, fill plastic disposable cups with fruit mixture. 
5.  Cover cups with plastic wrap and freeze cups on a cookie sheet until firm.
6.  Remove cups from freezer at least one hour before you want to enjoy them.

If you don't want to use disposable plastic cups, you can just make these in muffin tins instead and pop them out like ice cubes when you are ready to eat them.  I don't use very many plastic disposable cups, but I like to for this recipe.  The plastic cups make this a very portable, healthy snack alternative.  I think these would be great to stick in our insulated snack bag this summer for a refreshing treat during the rest periods at the pool.

I could not find a small can of orange pineapple juice concentrate, so I just bought a big can and then used about half of it in this recipe.  I mixed the other half with 1 1/2 cans of water, and we had orange pineapple juice for breakfast!

What's your favorite frozen fruit treat?

I've linked this recipe to Eat at Home's Ingredient Spotlight Bananas. 

Easy Quiche

This is an old standby recipe from the Queen's Quick and Easy Meals.  My mom first shared this quiche recipe years ago, but I have learned that it has many variations and all of them are yummy.  I love this recipe because of its versatility.  Whenever I'm caught with not exactly sure what to make for dinner, I can usually pull together these simple ingredients and whip up something yummy in no time.  I can usually scrape together enough ingredients from what is "leftover" in the frig, so it makes it economical, too.  I also love that the kids say, "Oh, I love that dinner!" when they smell it baking in the oven and eat their plates clean without complaining. 

Easy Quiche
Here's the recipe:

Easy Quiche
1/2 stick butter, melted
3 eggs
1 1/2 cups milk (I use 1%)
1/2 cup Bisquick (generic baking mix is fine)
1/2 tsp salt
1/4 tsp pepper
1/2 - 1 cup diced, cooked meat (ham, bacon, chicken, sausage) or vegetables (broccoli, asparagus, peppers, etc)
1 cup shredded cheese (swiss, cheddar, colby, or combination)

1.  Whisk together melted butter, eggs, milk, salt and pepper in a large bowl.
2.  Whisk in Bisquick.
3.  Fold in meat and cheese.
4.  Pour into greased pie plate.
5.  Bake for 45 minutes at 350.
6.  Let stand for 10 minutes before serving.

I sometimes will make 2 of these at a time.  I have not had great luck mixing a large batch and then dividing it up and getting the right proportions of liquid and solid, so I usually just make two bowls at the same time and then have one to eat and one to share.  This is a great meal to take to someone in need as it reheats nicely. 

We enjoyed our slices of quiche with a fresh tossed salad and some fruit and strawberry yogurt parfaits for dessert.

Easy Quiche
Light and fluffy eggs mixed with swiss cheese and ham baked until golden
and slightly crisp on top.  This simple supper was paired perfectly with a 
tossed salad topped with fruit and honey roasted soynuts and raspberry dressing.


What is your favorite kind of quiche?

Menu Plan - March 26 - April 1


It's Spring Break around here this week which means my Meal Plan is a bit looser than usual.  Let's just say I have ingredients to make certain meals on hand, and I have somewhat of a plan as to which night we're going to eat them.  I'm also trying to allow the kids some freedom to enjoy their week off from school, so things may not go all according to schedule, and that's okay.  The girls have some ideas of things they want to try out this week in the kitchen, and I love when they show an interest in cooking with me.

Here's what we plan to be enjoying around our table this week:

MONDAY - Turkey Noodle Soup, Salad
TUESDAY - Pioneer Woman's Sausage Pancakes on Sticks, tater tots, fruit smoothies
WEDNESDAY - BLTs, cheesy broccoli soup, Cherry Coke Cupcakes
THURSDAY - Chicken Pizza, Salad (not sure yet if it will be BBQ or ranch pizza)
FRIDAY - Fish Fry at church
SATURDAY - Backyard Birthday Cookout (burgers, brats, chips, veggies and dip, blueberry delight dessert)
SUNDAY DINNER - Pioneer Woman's Ranch Chicken and Crash Hot Potatoes, (both from her new cookbook that I had signed last week!), Asparagus

BREAKFAST CHOICES
Little Smokies/Waffles
Cereal/Toast
Baked Oatmeal
Ham and Cheese Corn Muffins

SNACK CHOICES
Snack Mix
Homemade Granola Bars
Cheese and Crackers
Fruit or Veggies

What's on your menu this week?

Need some inspiration?  Check out meal plans from kitchens across the country at Organizing Junkie's Menu Plan Monday.

Saturday, March 24, 2012

Fluffy Green Salad

Having red hair, I've always had a fondness for St. Patrick's Day.  We never really celebrated it when I was a kid other than wearing green to school.  But as a mom over the years, we've done some fun St. Patrick's Day activities.  Green food has always been a part of our festvities.  It's amazing what you can do with a bottle of green food coloring and some inspiration from the Internet!

This Fluffy Green Salad was the perfect accompaniment to our Corned Beef and Cabbage dinner this past week.  Because I had worked a full day at the gym meet last Saturday, we did not enjoy our Irish dinner until Monday, our typical Crock Pot Meal Day. Nonetheless, we devoured the tender meat and savory vegetables just as easily on March 19!  This sweet and tart Fluffy Green Salad comlimented the salty dinner very nicely.  The green coloring made it festive!

This Fluffy Green Salad is kind of a cross between a fruit salad and a dessert.  It was a recipe popular in the 1970's.  Maybe you remember eating it as a kid.  Most moms would add chopped nuts as the recipe suggested.  I don't like chopped nuts in my cool whippy type fruit salads, so we eat it without.  The few chopped nuts in the pistachio pudding are so fine that they don't seem to bother me.  We enjoyed bowls of the Fluffy Green Salad accompanied by a green shortbread cookie for our dessert.  It makes a great potluck dish and is loved by adults and kids alike.  When I have brought this dish to a gathering, I have caught guests scraping the bowl clean.  I have made this dish with fat free cool whip and sugar free pudding, and I can't tell a big difference from using the full fat and full sugar versions. 

Here's the recipe:

Fluffy Green Salad
1 lg can of pineapple tidbits or crushed pineapple (whatever is your texture preference)
1 sm box of pistachio pudding (sugar free/fat free work fine)
1 cup mini marshmallows (white or the pastel colored ones)
1 8 oz tub of Cool Whip (fat free, low fat, or regular)
a few drops of green food coloring, optional.

1.  In a medium bowl, combine the undrained pineapple and the pistachio pudding.
2.  Mix in the mini marshmallows.
3.  Fold in the Cool Whip.
4.  Add a few drops of green food coloring if you want to accent the green color.
4.  Refrigerate at least 4 hours before serving.

So what do you think. . .fruit salad or dessert?


I linked up this recipe over at Eat At Home's Spotlight Ingredient: Pineapple.  Check out some of the other great recipes that involve pineapple. 

I love my life, I hate my life!

To say that life around our house has been a bit chaotic and crazy these last few weeks would be an understatement!  Having survived the last couple of weeks and sitting now in front of the computer much less stressed than I have been, I can say that I am glad that Spring Break is here.  And while we are not traveling to some great tropical or amusement park location like many others, I am grateful that we'll have the week to be at home and just be.  We need that after the last few weeks.

The auction at the girls' school was a big success, but that project took much more time than I envisioned.  There were lots of little details at the end that seemed to consume my afternoons and evenings when I wasn't taking the girls to their various activities.  We came home with 2 of my favorite auction baskets - the Craft Basket and the Backyard Garden basket - so my girls were happy too.  We've already used many of the craft items and spent our gift card at Michael's yesterday picking up a few more new fun things to do over Spring Break.  It's been so beautiful here in Columbus this week that I'm thrilled to go cash in our gift card to Darby Creek Nursery.  The birds are chirping loudly in our front tree just begging for more food to be placed in the new bird feeder.  The littlest one won a giant doll house in the raffle which pleased and delighted her to no end. She had a hard time waiting for her name to be drawn out of the raffle basket, and I'm not sure what might have happened had her name NOT been called. She was adamant that the doll house was hers.  All in all, it was  a great night of fun , and we helped raise some money for the teachers and the students, so that made it all worth while!

Last Saturday, I worked a full day at a gym meet being sponsored by our gym (where the 8 year old does gymnastics).  We, too, had a successful event which means that our Booster Club will be able to sponsor some great activities for the kids and give a portion of our meet fees back to the parents which is great too.  My legs were aching, however, at the end of the day!

John has been traveling for work, so much of the last few weeks has been done as a solo parent.  That has made it all a bit crazier than usual.  We miss him in many ways when he is gone, but hopefully we are able to all show our appreciation for him more when he returns.

In the midst of all these crazy days, we have been eating healthy homecooked meals.  But because my photography skills are not my strength, I haven't had the patience to try to photograph the dishes and the process it takes to create them.  I have such admiration for other bloggers who seem to be able to do this task so easily.  How do they manage to photograph the food and get it on the table for the hungry eaters and still keep up with laundry and house cleaning and running errands and going to kids' activities?!  I'm still working on that one!

Ree Drummond over at The Pioneer Woman is one of those bloggers.  I just love her photography and her writing style.  I have become a regular viewer of her show, too, and love her personality and am fascinated by her ranch life.  She appears so genuine and kind, and I love her dry sense of humor.  Her hair is fantastic, too.  I love long red hair, but even though my hair is red, it does not look good long.  So, I have always worn it short or moderately short.   And her food. . . well. . . it's just comfort and bliss.  And comfort food is what I like best.  Several of her recipes have been tried out by our eaters and given rave reviews.

Wednesday, as I was coming down from my couple weeks of craziness, I popped open my e-mail to read a few blog updates while waiting for a load of wash to finish spinning out.  Waiting in my inbox was my daily dose of The Pioneer Woman's wisdom on Confessions of a Pioneer Woman.  I couldn't believe when I read in her post that she was on her way to Columbus, OH, for a book signing.  I quickly switched windows and opened up Barnes and Noble's website and saw that she was indeed coming to Columbus for a 6:00 pm book signing.

This was the moment that I realized, "I love my life; I hate my life!"  It was one of those 10 year old temper tantrum/extreme feeling kind of moments.  That morning I was so grateful that I had survived the last couple of crazy weeks and so grateful for my 3 beautiful, healthy, active children, and my loving husband who provides so much for us.  I was so grateful that my girls can experience so many extras like gymnastics, and singing group and scouts and go to a great school and have friends.  And I have a house that I love making our home.  But because of all those wonderful things, I could not do the one thing on a spur of a moment that I would really love to do - meet Ree Drummond in person.   Wednesdays is our craziest schedule day and our laundry is still piled up from the last several days because our washer was having some technical difficulties.  How can I take some time to go off and meet some famous person?


So, I headed over to Barnes and Noble around 5 figuring I would have plenty of time to get in line, get her book signed, and then still make it to our Brownie meeting a bit late.

Well, guess what happens when you are as kind and genuine and personable in real life as you are on tv or on your blog or in your books?

You take time with each person that has come in to meet you.  And a lot of people want to meet you because you are such a really great person.  Like 250 people who thought to come and get a ticket before 5:00!  And at least 250 more people who came in after 5:00!

I left Barnes and Noble at 10:00 pm.  But it was worth it!  It was really a life experience to stand around and talk with so many others who share my passion of food and fascination of her ranch life.  It was remarkable to see how her story has reached people (mostly women) of all ages and backgrounds and how far some had driven to come and meet her.

I had never been to a book signing, so I wasn't exactly sure what to expect.  I was texting my husband to clarify a few things about our schedule, so I was standing near the front door of the store to get a strong cell signal, sort of behind the display for the Nooks.  I was trying to just stay out of everybody's way because I don't really like crowds. 

It turned out to be the perfect place to stand, however, as I was about 8 feet from her signing table when she arrived at the store and gave a 30 minute slide show presentation about her life (just in case there were people there who didn't know who she was!).   I watched her interact with about the first 50-75 people in line, and I was so amazed at how much time she would take with each person as she signed their books and took pictures with each and every one!  She never stopped smiling and seemed so humble.  Later her Marlboro Man came in and he caused quite a commotion.  He, too, is just a very humble, personable man and much thinner than he looks on tv, despite eating all her yummy butter laden foods.  He was wearing his Wranglers and his hat, but I won't talk too much about that as my husband is a follower of the blog!

"To Jill, The Queen of the Easy Meal
Love, Ree D"

Ree is just as sweet as she can be!  And our hair is exactly the same color!  She's also a lot thinner in real life than she appears on tv.  How can that be with all her delicious food?  Maybe I need to eat a little less of it?!  Or maybe I need to go out and chase after some wild mustangs or walk the hills of the prairie rather than just the aisles of Target and Kroger?!

Ree's new book, The Pioneer Woman Cooks Food From My Frontier, is well worth the money!  It has many of the recipes that have been included on her show plus lots of other delicious looking ones I can't wait to try out.  I think the two that we'll try this week are the lemon blueberry pancakes and the apple dumplings.  Her photography skills have continued to improve and she's added a lot of new twists to some old comfort food favorites. 

So, at the end of the day. . . I love my life, I love my life!

Thank you, John, for saying I should go!  It was worth it!

Tuesday, March 13, 2012

Happy Pi Day!

My 11 year old informed me afterschool today that tomorrow, March 14, is International Pi Day!  (You know pi. . . . 3.14. . . like you learn about in math class. . . . )  In celebration of this grand event, I announced that we would be eating only round foods for dinner on Wednesday!  The kids decided we should have pizza, salad served in a bowl, and ice cream pie for dessert.  I'm sure we'll tie in a few measurement lessons before we dig in.  The kids are certainly excited about dinner, and I love any kind of dinner celebration!

I tried out the Pioneer Woman's Pizza Crust recipe last week with great success!  I made a few changes to her original recipe, namely I did not let it rest in the refrigerator as she describes.  I just made it a few hours ahead because we had a few last minute changes in our schedule and meal plan.  I let it rest on the counter similar to the artisan bread recipe.  The dough was sticky, but with a little flour on my hands, I was able to turn it into a pizza crust with no problem at all.  The crust was delicious with just the right amount of crunchiness and chewiness to suit our family's tastes.  I love that I did not have to knead the dough as I seem to lack kneading skills. 

Here's the recipe from Pioneer Woman:

Pizza Crust

1 teaspoon Active Dry Or Instant Yeast
4 cups All-purpose Flour
1 teaspoon Kosher Salt
1/3 cup Extra Virgin Olive Oil


1.  Sprinkle yeast over 1 1/2 cups warm (not lukewarm) water.
2.  In a mixer, combine flour and salt.

3.  With the mixer running on low speed (with paddle attachment), drizzle in olive oil until combined with flour.
4.  Next, pour in yeast/water mixture and mix until just combined.
5.  Coat a separate mixing bowl with a light drizzle of olive oil, and form the dough into a ball.

The Pioneer Woman states to put the dough into a greased bowl and cover and place in the refrigerator for at least 24 hours.  I did not.  I just let mine sit on the counter in a greased bowl covered with a towel.  It still worked.  Not sure if it tasted like Ree Drummond's, but it was still good.

We'll be having our pizzas topped with round pepperonis of course!  I wonder what other round things I can come up with to put on the pizza in honor of International Pi Day!

For dessert, we'll be having one of my easy desserts - ice cream pie.  This is one I have shared with many friends looking for a tasty easy dessert.  The trick to making this one look like something fancy is all in the presentation.  I just drizzle some sort of topping all over the plate artistically like they do at restaurants.  It fools my guests every time.  They think I spent hours and hours making some fancy dessert.  I never tell them this one takes less than 5 minutes to prepare!  

I have made endless variations on this easy ice cream pie.  Some of my favorites are mint chocolate chip in a chocolate crust drizzled with dark chocolate, black raspberry chip in a chocolate crust drizzled with marshmallow, butterfinger in a chocolate crust sprinkles with additional butterfinger candies, prailenes and cream in a graham cracker crust topped with caramel and Heath chips, strawberry cheesecake in a graham cracker crust topped with strawberry syrup. . . the possibilities are endless.

Easy Ice Cream Pie
Graham Cracker Pie Crust (chocolate, regular, low fat, shortbread, store brand, homemade)
1/2 gallon of your favorite ice cream, softened
Ice Cream topping (chocolate, caramel, marshmallow, butterscotch, etc)
whipped cream
cherries or chocolate shavings or sprinkles or something for garnish

1.  Pick your favorite ice cream and topping combination. 
2.  Soften ice cream on the counter for 10 minutes.  (Often I make this right when I come home from the store as the ice cream is just about perfect)
3.  Carefully spoon the softened ice cream into the graham cracker crust.  (Sometimes I add a layer of ice cream topping on the bottom before I put on the ice cream.  Hot fudge works great as a bottom layer)
4.  Cover the pie and freeze for several hours before serving.
5.  Remove from freezer about 10 minutes before you want to serve dessert.
6.  Cut a slice of pie and place on a plate.  Drizzle the top with additional topping and whipped cream and garnish so that it looks like something you'd get from a restaurant.
7.  Serve with a smile.

I'll be sure to post pictures of our Pi Day Celebration!

What round foods will you be serving on your table in celebration of International Pi Day?!

Thursday, March 8, 2012

Walking Tacos and Dirt Pudding Cups

Thursday Night is Kids Pick Night on our weekly menu plan.  Sometimes I actually let the kids pick what we have, sometimes I just pick something that I know they would choose if given the choice.  What's funny is that the things that the kids usually pick are things that are very easy to fix and have very simple ingredients.  Most of the things they pick don't really have "recipes", but maybe we all need to be reminded that kids love simplicity.  This is a simple dinner with a simple dessert.  Add some fresh fruit and you'll have a winner dinner around your table!

Walking Tacos and Dirt Pudding Cups were chosen by me this week based upon what I found on sale at the store this week and what we had in our pantry and freezer, but these two items were well received by everyone at our family dinner table tonight.  These are two easy recipes that kids love to eat and kids love to help make.  I have fixed these two recipes with many young Girl Scouts at Camp KJ over the years. 

I'm not sure where Walking Tacos originated, but I know that we've enjoyed eating them sitting down for many years.  It's kind of like a taco salad, but somehow my kids like eating a "walking taco" over a "taco salad" so we call it "Walking Tacos" at our house!  The 8 year old said, "It's like nachos, only not melted!"  Walking Tacos are usually made with Fritos, but I decided to change things up a bit from our normal recipe by using Doritos instead.  I picked up 2 bags of Nacho Cheese Doritos this week at Meijer for $1.50 each using an instore promotion and a coupon, so I wanted to use some of them for this meal.   I noticed that Taco Bell's current $5 Meal Box Promotion this month is a taco shell made out of Doritos so it must not be too weird of an idea. 

The 3 year old picked out a package of Gummy Worms as her treat at the store this past week, so I wanted to finish up the package before they got too hard to eat.  I had some chocolate pudding mix in the pantry and a container of crushed Oreos in the freezer.  I was trying to clear space in my kitchen pantry awhile ago and we had a 1/2 eaten package of Oreos in there and a cookie jar full of homebaked goodies, so I just crushed them up my blender and threw them into the freezer to use for an occasion just like this one.

Let's just say that it was a 2 Napkin Meal around the family dinner table tonight!  The kids liked their Walking Tacos, but they decided they prefer the traditional Fritos to the Doritos.  I could go either way as Doritos are one of my favorite junk food items.  I think the nacho cheese flavor gives the dish a little zing, but I missed the traditional corny crunch from the Fritos.  The kids put together their own servings of Dirt Pudding right at the table scooping up Oreo cookie crumbs, chocolate pudding, and adding in some gummy worms.  Had I been completely prepared, I would have had them use little flower pots, but my attention has been focused this week on putting together Auction Baskets for the girls' Spring Carnival at School, so we just ate them in mason jars.  I saw The Pioneer Woman fix her chocolate pudding that way and it seemed like a neat idea.

Here are the recipes:

Walking Tacos
Fritos or Doritos or Tortilla Chips
1 lb taco meat (add homemade seasoning or store bought to browned ground beef)
shredded cheese
shredded lettuce 
Tomatoes 
Taco Sauce or Salsa
Sour Cream

Place Fritos/Doritos/Tortilla Chips in bowl or on a plate.
Top with a scoop of meat.
Sprinkle on your favorite toppings (cheese, lettuce, tomatoes, taco sauce, sour cream, etc)
Eat with fingers or a fork.
Have plenty of napkins on hand! 

(Sorry for the sloppy photo; did not notice the mess on the
edge of the dish until I got ready to post the photo!)

Kids Version : "Walking Taco"
Adult Version: "Taco Salad"


Dirt Pudding Cups
Crushed Oreo Cookies
Chocolate Pudding (instant or cook and serve or even a Pudding Cup will work)
Gummy Worms
Whipped Cream

Place some Cookie Crumbs in the bottom of a dish.
Top with a large scoop of chocolate pudding.
Sprinkle with a few more cookie crumbs on top to resemble dirt.
Place gummy worms on top or poke down into the pudding layer.
Make a whipped cream flower bud on top.

Dirt Pudding Cups
Oreo Cookie Crumbs, Rich Chocolate Pudding
Top with a whipped cream flower bud

What's on your Kids' Pick Night Menu?

Wednesday, March 7, 2012

Slow Cooker Pork Carnitas

This morning at school, I ran into a friend who mentioned that she had made some very yummy pulled pork sandwiches using a method similar to my Suit Yourself Chicken Sandwiches.  She just seasoned up a pork roast and let it cook slowly, shredded it, and served it for dinner.  Her husband and children gobbled it right up!  She seemed pleasantly surprised that something so easy could result in something so tasty.  Welcome to my world of cooking, Friend!  I love those kinds of dishes where it appears that you've spent lots of time and money when really you have not.

Hearing her share her dinner delights, reminded me of another family favorite that is super easy to fix in the crock pot.  Pork Carnitas is one of my middle daughter's favorite meals.  I had made a HUGE batch right before Christmas, and we finished it off a few weeks ago.  I'm sure it will be making the rounds on our weekly meal plan before too long, but I didn't have anything else earth shattering to share today, so I thought I'd pass along this easy recipe even though I don't have accompanying pictures.  This one doesn't photograph too well anyway with my novice photography skills as it's shades of brown.

I created this simple dish one day when I was going to fix shredded BBQ pork. But when I went to the freezer, I realized that I did not have any buns.  I only had tortillas, and then my wheels starting turning.  I remembered seeing a recipe for "pork carnitas" in a magazine and I thought I could probably come up with something similar using the ingredients I had on hand.  I'm not sure these are anywhere close to authentic pork carnitas, but I can tell you that they are very yummy, inexpensive, and super easy to fix.  Since that day, they have become a regular request on our weekly meal plan.

This recipe uses just two simple ingredients:
*about 3 lb. or more pork shoulder/butt roast (often cut and labeled "Western Ribs" here in central Ohio; aim to pay less than $1.79/lb)
*taco seasoning (homemade or store bought)

Drizzle a little olive oil in the bottom of your slow cooker, about 1 Tbsp.  If you don't do this when you slow cook meat in your crock pot, you need to start doing this simple step.  It makes a big difference in the taste of your meat.  It gives it a whole new depth of flavor. 

Season the meat liberally with your homemade or store bought taco seasoning.  Rub it into both sides of the meat.  Your hands will get all yucky, so make sure you put the seasoning into a small bowl so you can just reach into the bowl and sprinkle on more as you need it.

Place the meat in the slow cooker.

Cook on low for 6-8 hours until meat is fork tender. 

Shred meat with fork and mix with the juices in the crock pot.  Pull out any bones or fat. 

Return to slow cooker to keep warm until time to eat.

Serve shredded pork in warmed tortillas and top with cheese, lettuce, tomatoes/salsa, avacado/guacamole, and sour cream.  We also like to have a side of rice and a fruit salad.  We've also eaten this on tostada shells which are kind of a fun change from soft tortillas.  We like them best with wheat tortillas over the white ones.  The sweetness of the wheat compliments the pork.

Sometimes I add pinto beans to the cooked meat.  Not only does this stretch the meat into more meals, it increases our fiber intake.  The kids never seem to notice the beans mixed in there.  I have bags of cooked beans in my freezer that I just pull out and add to the crock pot after the meat is cooked, but you could also use a can of pinto beans, rinsed and drained. 

I try to look for "boneless western ribs".  I can usually find these at Meijer, but they are a little trickier to find at Kroger.  I have also used the large pork loin roast, but honestly the cheaper cuts with a little more fat marbling through them make for more tender shredded meat.  If you use the more lean roast, you might need to add a 2-3 Tbsp of water when you cook the roast.

What's your favorite way to slow cook pork?

Monday, March 5, 2012

Meal Plan for March 5-12


One of the best things I've done in my kitchen over the years is to meal plan! Having a plan written down makes that "witching hour" of 4:30-6 pm go so much more smoothly. Do we always follow the plan down to each detail? No, not always. Sometimes what I plan on Sunday to eat on Thursday isn't what I feel like fixing come Thursday. Or we might have a change in plans that will not allow for me to make what's on the menu. Or I might forget to get the meat out of the freezer in time to thaw. But it's a start, and that's what matters most. A plan is a very good thing to have!

With our busy schedule and commitment to eating together as a family nightly, I've come up with a thematic night approach to planning our weekly menu. I've used a variety of menu planning strategies over the years, and this seems to be working best for our family at this stage of life. We have fruit at every meal, but I don't always write that down in the plan. We just sort of pull together what we have on hand.


Here's what's on our menu for this week. 

CROCK POT Monday - Honey Garlic Chicken, Rice, Steamed Broccoli
COMFORT FOOD Tuesday - Potluck Meatballs (as seen on Pioneer Woman), Mashed Potatoes, Asparagus
SANDWICH Wednesday - Ham/Cheese Stromboli, Salad, Chips
KIDS PICK Thursday - Walking Tacos, Dirt Pudding Cups
MEATLESS Friday - Pasta with Red Sauce, Cheesy Garlic Bread, Salad
NEW RECIPE Saturday - Make your own pizza (new pizza crust recipe from Pioneer Woman), Italian Salad
BRUNCH Sunday - Egg Casserole, English Muffins with Strawberry Freezer Jam
QUICK BITE Sunday Night Dinner - Turkey Burgers, Sweet Potato Fries, Salad, Cupcakes

Breakfast Options This Week:
cereal/toast
vanilla yogurt with fresh strawberries and homemade granola
hard boiled eggs
ham/cheese corn muffins

Snack Options This Week:
Veggies/Dip or Fruit
Cereal
Graham Crackers with peanut butter/marshmallow fluff
Granola Bars/Gogurt
Popcorn

I'll post recipes and pictures as I make the meals. this blog is a work in progress. Thanks for following.

What's on your menu this week?

If you need further inspiration for meal planning, check out Menu Plan Monday over at Organizing Junkie.  Lots of bloggers have linked up their menu plans for the week.  It's a neat way to do a little blog hopping and get some new ideas.


Friday, March 2, 2012

Peach Cobbler

One of the many things I love about my freezer is all the summer fruits I have tucked away on the third shelf.  I love pulling them out in the middle of winter to remind me that summer will soon be back and we can once again enjoy long days of sunshine, fun in the backyard, lazy afternoons at the pool, and numerous fresh fruits and vegetables.

This past summer, we picked up a bushel of fresh peaches out at Yutzy's Farm Market.  I sliced, cut, and froze lots of bags of peaches because the crop was delightfully sweet and plentiful this year.  I first made this particular peach cobbler this summer and decided to try it with my frozen peaches over this past weekend.  The peaches lost their firmness a bit, but the taste was just as yummy as it was this summer.  This recipe is a mix of several I found after doing a Google search for "peach cobbler."   The topping is like a sweet cake and the cinnamon gives it a deep, rich flavor in contrast with the tart peaches.  Add a scoop of french vanilla ice cream and you're all set!

The cobbler tastes best the first day, preferably still warm from the oven.  It does not get all runny, however, by the second day, as many fruit filled desserts can.  I have to exert great self control to keep from snitching bites of it while sitting leftover on the counter.  Maybe the family will never notice that their portions are a bit smaller that second night! 

I thought I took a picture of this on Saturday, but I must not have as I can not find it on the camera.  The oldest daughter and her friend helped me make this dessert on Saturday during their afternoon playdate.  They couldn't believe that when you put it in the oven the fruit is on top, and when it comes out of the oven the fruit is on the bottom!  I tried to refrain from making our baking session into too much of a science lesson.  It's not always cool to have a teacher mom, especially when you're 11 and have a friend over. (Or at least that's what I've been told!)

If you have some peaches in your freezer, give this a try.  If not, file this one away until peach season comes back around.  Just make sure that the peaches you use smell like peaches.  (that means don't go out and buy peaches right now in March to try this recipe; they don't smell or taste the way peaches are designed to smell/taste)  I'm not sure if it would taste the same with canned peaches.  If you try it, let me know.

Here's the recipe:

Peach Cobbler
6 Tbsp butter
1 cup flour
1 cup sugar
Pinch of salt
1 Tbsp baking powder
1 Cup milk
4 cups fresh peach slices
1 cup sugar
1 Tbsp lemon juice
Ground cinnamon

1.  Melt butter in bottom of greased casserole dish. (I used my Corning Ware Large Oval)
2. Mix together flour, sugar, salt, and baking powder in a mixing bowl.
3. Add milk to dry ingredients and stir to combine.

4. Pour batter over melted butter in casserole dish.

For the filling:
1. In a saucepan, mix together peaches, sugar, and lemon juice.
2. Bring to a boil until thickened.
3. Pour over batter and butter mixture. 
4. Sprinkle with cinnamon.

Bake uncovered for 40-45 minutes at 375 until slightly brown and cooked through.
During baking, the batter rises to the top forming a beautiful topping.  Serve warm with vanilla ice cream.
You can use frozen peaches, but the peaches will lose a bit of their texture during baking.

Thursday, March 1, 2012

Italian Sliders

I love to try out new recipes!  In our weekly menu plan, I usually try out some new recipe on Saturday because that is the one day of the week where we are usually not heading out the door or in the door right around the dinner hour.  I can have time to figure out how to adapt a recipe to fit our tastes/needs without worrying so much about a time table.  This week, we had a busy Saturday morning, but the girls each enjoyed a playdate at our house in the afternoon leaving me some time to tinker with a new recipe.

I first read about these Italian hamburgers on She Cooks this summer.  As I read the description, I was intrigued and I have been waiting to try these out.  I found some slider buns on sale at Kroger last week and also had a pound of ground round in the freezer, so I thought I would try to make a slider version of her big burgers.  It seems that sliders (mini burgers) are all the rage at restaurants these days.  My girls love to order them at Texas Roadhouse.  They are the perfect size for little hands, and the bigger eaters can eat two (or three if they are really yummy!)

Let's just say that these Italian sliders were devoured by my hungry crew amidst licking lips and fingers.  The patties were moist and juicy, and the marinara sauce topping was the perfect accompaniment.  I did not have fresh basil, so I used some flat leaf spinach, but these will be divine in the summer when my basil plant is in full bloom!  They tasted a bit like a flattened meatball, but the garlic toasted slider buns made these burgers worthy of being served at a restaurant.  They would go great with the garlic parmesan fries, but we ended up just having salad and chips and a peach cobbler for dessert.  All the eaters agreed, "This is a keeper, Mommy!  When can we have them again?!"

Here's the recipe:

Italian Sliders
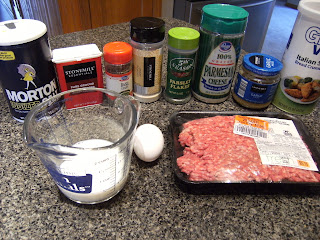
1/2 tsp onion powder
1 tsp minced garlic
1 Tbsp dried parsley
1 1/2 tsp dried basil
1/3 cup parmesan cheese
1/2 cup Italian breadcrumbs
1/2 tsp salt
1/4 tsp pepper
1/2 cup milk
1 beaten egg
1 pound of ground round (I had 1.17 lb package)


Additional ingredients, not pictured

slider buns (just mini hamburger buns; Kroger sells them as a store brand item)
olive oil
garlic salt
1/4 lb mozzarella/provolone cheese
1 cup marinara sauce
basil or spinach leaves


1.  In a large bowl, combine the onion powder, garlic, parsley, basil, parmesan cheese, bread crumbs, salt and pepper.
2.  Add the egg and milk and mix well.
3.  Crumble the ground meat over the egg/milk/spice mixture and mix with your hands until it's all combined.
4.  Form meat into 10-12 patties and place on a foil lined baking sheet.
5.  Bake for 20-25 minutes at 350 until patties are cooked through.

6.  On a separate baking sheet, open the slider buns and brush the insides with olive oil and sprinkle lightly with garlic salt.

7.  Warm about 1 cup of marinara sauce in the microwave.

8.  When the burgers are cooked, pull them out of the oven and top with some cheese.  (I used shredded because that is what I had; I think sliced might work a bit better but I was able to get a combination of the mozzarella and provolone using shredded which was great!)

9.  Return the burgers to the oven for a few minutes until the cheese is melted.

10.  Lightly toast the buns in the oven.  (You can put them on the top rack while you melt the cheese on the burgers.)

11.  Place the cheese topped burgers on the toasted bun and add a spoonful of marinara sauce and a few pieces of spinach or basil.

Serve with your favorite mixed greens and a drizzle of olive oil and vinegar (or Italian salad dressing) and chips or fries.  This meal could easily be served at any bar/grill type restaurant for a fraction of the cost. (minus the greasy fingerprint on top of the bun; I was trying to get the dinner on the table for a hungry crew after their afternoon playdatesOnce again, just reminding you that this blog is about real people eating real food in real time!)

Italian Sliders
Served up with a side salad and some chips, this could be served at your local bar/grill

What's your favorite restaurant style recipe that you've learned to fix at home for a fraction of the cost?