Tuesday, January 31, 2012

Fruit and Nut Salad

We eat salad at nearly every dinner meal.  I grew up with the standard dinner salad - ice berg lettuce topped with ranch or Italian dressing, maybe a tomato, carrot, or celery on top if Mom had time.  The development of bagged salad, however, inspired a whole new way of eating greens daily for me and many other Americans.  Standing in front of the bagged salad section at the grocery store, there are just oodles of varieties of greens to create your salad base.  I have not purchased a head of iceberg lettuce in the last 10 years!

Over the years, I have streamlined some of my creative cooking ideas into the salads that we have on our table.  I love coming up with new and different combinations of items we have in the frig and pantry to compliment the healthy greens in my produce drawer.  I love finding new flavors for dressings or salad toppings that will compliment the simple main dish foods my children will eat without complaining.  My favorite combination atop a bed of mixed greens is the addition of both fruit and nuts.  I love how the tender greens mix with the sweet fruits and the saltiness of the nuts provides crunch and a punch of flavor. 

This Fruit and Nut Salad is one that I have used many times throughout the years, and I often vary what fruits and nuts I add depending on what we have on hand.  My favorite combination is red and green leaf baby lettuces topped with red grapes, apples, and toasted almonds or pistachios. The key to this salad is the light dressing that can be made in just a few minutes with simple ingredients from your frig and pantry.  You can store the dressing in a small jar for a couple of weeks, just shake it well before serving.

Here's the dressing recipe:

Fruit and Nut Salad Dressing:
1/4 cup canola oil
3 Tbsp sugar
3 Tbsp lemon juice
1/4 tsp lemon peel
few shakes of Salt and Pepper to taste

Place all ingredients in a small jar and shake with the lid on (or whisk together) until blended.

When I served this salad this week, I found a small package of Heart Healthy Nuts from Planters in our pantry that we received in a gift snack basket.  The combination of walnuts, pistachios, almonds, and peanuts complimented the red grapes and Fuji apple perfectly.  I had only green leaf lettuce in my produce drawer this week, but the combination of the red and green will make a prettier salad.

Fruit and Nut Salad

What's your favorite salad topping?

Guest Post - A Leisurely Breakfast on a Snow Day

It's the last day of January!  In years' past, we've usually had at least one Snow Day by this time.  Snow Days are the best when you can stay home and not have to worry about going out with all the crazy drivers!  I have been putting together a Snow Day Kit to use with my kids when (or if) we have a Snow Day in 2012.  I've stocked up on a few special food and craft items to keep us entertained between making snowmen, snow angels, and igloos and shoveling snow from the driveway and sidewalks.  I invited my friend, Amy, to share a favorite Snow Day recipe today.  I love how she's created a special tradition with her kids and how she shares that it took her many attempts to create the dish she envisioned.  I have a few more posts of our own Snow Day traditions I'll be sharing later on.  Tuck them away. We're bound to wake up to a Winter Wonderland and school closings some day this winter!

A Leisurely Breakfast on a Snow Day
By Amy

As any busy family knows, breakfast on a school day morning can be rushed and a little lack-luster to be honest.  My three children each have different wake-up times and school start times, so making a hot breakfast three times in one morning is not happening that often.   Cold cereal, yogurt, and fruit are the norm in my house in the a.m.

However, on the rare and glorious “Snow Day”, my kids are not only pumped-up about playing outside in the snow, but also for the kind of breakfast we all wish we could indulge in daily.  I am talking about the works…bacon, eggs, toast, and the star of this show—pancakes.  These are not your everyday pancakes.  This recipe is one that I developed over A LOT of research and trial and error. 

My husband has had an obsession with Cracker Barrel’s Buttermilk Pancakes for many years.  He claims they are the absolute best.  And, I have to agree.  They have a dense texture and a different flavor from a normal pancake.  I have tried many so-called “copy-cat” recipes to no avail.  They were decent enough pancakes, but they were lacking something that makes Cracker Barrel’s pancakes so special.  Then, one evening while dining at Cracker Barrel, I noticed they started selling their pancake mix in their store.  I immediately picked up a box and studied the ingredient label.  Two ingredients caught my attention…rye flour and corn flour.  Mystery solved.    

It took a few attempts to tinker with the quantities, but I say they are darn close to perfection.  So, please enjoy this recipe--especially on a fun and relaxed Snow Day!

Mmmmm. . . . . . . .Pancakes!
Here's the recipe:

Just Like Cracker Barrel Pancakes:
1 cup     all-purpose flour
¼ cup    Rye Flour*
2 Tbsp   Corn Flour**
3 Tbsp   Sugar
1 tsp      baking powder
½ tsp     baking soda
½ tsp     salt
1            large egg, beaten
¼ cup    vegetable oil
1 cup     buttermilk (plus additional if needed to thin batter)


Mix all the dry ingredients.  Add egg, oil, and buttermilk; stir just until it is evenly mixed (add more buttermilk as necessary if you find the batter too thick).  Let batter rest as you heat the griddle to medium-low heat (be careful with the temperature…the sugar in this batter will cause to pancakes to brown rather quickly).  Brush surface with vegetable oil (my choice over butter because it doesn’t burn).  Cook until edges begin to look dry (about 2 minutes) and flip.

*  Rye flour is available in most grocery stores.  Bob’s Red Mill (see note below) or Hodgson Mill are two brands I’ve seen.

** Corn flour is harder to come by.  If you can’t find it, take yellow corn meal and pulverize it in your blender until it becomes “flour”-like in texture.

F.Y.I. --If you are looking for an authentic Cracker Barrel experience, their syrup is a mixture of 55% pure maple syrup and 45% cane syrup.  I have never seen cane syrup sold in stores before, so I substitute corn syrup.  I know…it’s bad. But, so is fake maple syrup-- so, arrest me now sugar police!

A note on Bob’s Red Mill—I love Bob.  Check out his website http://www.bobsredmill.com/.  All of our big chain grocers carry at least some of their products.  They have an organic line and gluten free, plus an amazing selection of flours.  They even have something called “Green Pea flour”…whaaa??  Anywho, they just offer a good, wholesome line of products that I have found to be consistently excellent.

Monday, January 30, 2012

Easy Vegetable Soup

It was time to put together my Spaghetti Soup last week, but when I went to the pantry to get a box of spaghetti, I realized that I had every possible noodle shape except spaghetti!  While I certainly could have made the soup with a different noodle, I decided to make a pot of quick vegetable soup instead.

I like this soup vegetable recipe because it can be made quickly and ahead of time.  In fact, it tastes better after it has been sitting on the stove or reheated on a new day.  I also like this soup because my kids eat the whole bowl and it goes great with grilled cheese sandwiches, a favorite comfort quick food at our house.  We like it without meat making it budget friendly, but you could certainly throw in some beef or chicken if you want a heartier meal.  I now make this soup with home canned tomatoes (from my mother in law) and home canned spicy tomato juice (from my dad), but I used to use just canned tomatoes and Spicy V-8 juice from the grocery store.  I was in a bit of a time crunch this week and even discovered a faster way to prepare this soup to fit our busy, on the go schedule. 

Here's the recipe:

Easy Vegetable Soup
1/4 cup diced onion (dice it small so there are no big chunks)
1/4 cup diced celery (use the inner celery stalks with the leaves)
1 can diced tomatoes
1 12 oz. can spicy V-8 juice
3 cups beef broth (I use 3 cups water, 4 beef bouillon cubes)
1 or 2 potatoes, peeled and diced
1 bag of frozen mixed vegetables
1 heaping tsp basil
1 tsp salt
1/4 tsp garlic powder
2 bay leaves

1.  Drizzle 1 tbsp olive oil in the bottom of a large stock pot.
2.  Saute the chopped onion and celery for 1-2 minutes.
3.  Add the tomatoes, V-8 juice, beef broth, vegetables, and spices to the pot.
4.  Bring to a boil with the lid on the pot.
5.  Reduce to a simmer and cook until vegetables are tender (about 15 minutes).
6.  Turn off heat and let stand with the lid on until you are ready to eat. 

**The soup will stay warm for a couple hours if you do not take the lid off.  You can also reheat it a bit if necessary at dinner time.

**I learned out of necessity that you can also start preparing this soup 15 minutes before you have to leave the house, bring the soup to a boil, turn off the heat, leave the lid on, go pick up your kids from school, and the soup will be ready when you come back home! 

**I boil just one cup of water in the microwave, add the 4 bouillon cubes to that one cup of water and then add more water to the pot instead of trying to boil 3 cups of water. 

**You can also throw in some shelled edamame with the mixed veggies if you want to add in some extra soy protein; they look like lima beans.

Easy Vegetable Soup
I may be the Campbell's Soup Label Lady at the girls' school, but this
homemade soup is so much better than the stuff in the can.  Give it a try today!


What's your favorite quick soup recipe?

Sausage Balls

Sausage Cheese Balls
A popular recipe of the early 1980's was Sausage Balls appearing in many cookbooks and magazines.  Did your mom ever make these?  We used to eat them as appetizers at Christmas time. 

I made a batch of sausage balls for a Birthday Party for Jesus I hosted for my kids and some of our friends years ago.  The kids just loved these little bite sized morsels of sausage, cheese, and biscuit mix.  Since then, I have kept them a regular go to item in my recipe file for enjoyment at any time of the year.  They make a great protein addition to breakfast or a quick afterschool snack.  They reheat wonderfully in the microwave, just 15 seconds for 3 sausage balls.  My kids love to eat them with a sword toothpick!

Saturday morning, the kids and John were watching Star Wars the Clone Wars, so I decided to put together a batch of Sausage Balls for us to enjoy for breakfast along with some scrambled eggs and fruit.  We had a very busy Saturday with the girls' activities, so it was nice to have a relaxing breakfast all sitting down together at the table before we all went our separate ways for the day. 

I like this recipe because it contains just 3 simple ingredients and can be assembled in about 10 minutesI had picked up the sausage for $1.30 last week, and I still had a bag of shredded cheddar in the frig making it a low cost recipe.  This recipe is easy enough and turns out so good that my husband has made them for some of his work/social gatherings over the years.  I've found that cooking them on a piece of foil sprayed with Pam makes the clean up super easy, too.

Here's the recipe:

Sausage Cheese Balls
2 cups Bisquick (or all purpose baking mix)
2 cups shredded cheddar cheese
1 lb pork sausage

1.  Mix all ingredients in a large bowl.  Use a pastry blender, fork, or your hands to combine it all together.  Add a drop or two of water if it seems too dry.  (the fat content of the sausage and cheese varies, so sometimes I need to add a little more wetness to hold them together)

2.  Roll mixture into 1 inch balls and place on a greased, foil lined cookie sheet.

3.  Bake for 20 minutes at 350.

Enjoy as a breakfast treat, an appetizer for a party, or as a snack!  Eating with a sword toothpick is optional!
Sausage Cheese Balls

What's your favorite 3 ingredient recipe?

Weekly Shopping Trip

We had a busy week and I didn't make it to the store until Sunday afternoon.  I do not like going grocery shopping on the weekends because it seems to take me longer because the stores are so crowded.  I also cannot find as many manager specials which makes my trips more expensive.  Shopping on the weekend, however, means that I can go to the store without my 3 year old helper.

Kroger had a great buy 10, get $5 off promotion this week and they will still be running this same promotion next week.  I usually use this type of sale to stock up on items at low cost for our pantry/freezer.  I have to use a numbered list, however, because if you don't get exactly 10 items (or a multiple of 10), it's not such a great deal.

I aim to spend about the same each week (under $100).  Some weeks I come home with a lot of items, some weeks not as many.  This seemed to be a week where I had fewer, higher priced items.  I needed honey, popcorn, and yeast which are items not usually on sale.  My pantry is currently stocked with many boxes of cereal, so unless I can get it for under $1, we don't need any more for awhile.  We still have several oranges and apples in the fruit bin and some carrots, celery, and cucumber in the vegetable crisper.  We do eat packaged chips, crackers, and ice cream although I try to keep us healthy and homemade as much as possible.  And yes. . . that's Velveeta Cheese and Shells on the counter.  Even the Queen of the Easy Meal needs a quick, box meal in her pantry as a back up.

Here's what I brought home this week and a few of the best deals I found:
*** 10 pound spiral cut ham @ $1.49/lb
***.18 cent canned tomatoes X 2
***$1 fresh pineapple
***$1 4-pack yogurts X 3
***.75 pasta sauce X 3
***.49 cent hot dog buns
***$2 lunch meat X 2
***Samoa ice cream - YUMMY!

Total Spent: $75.92
Total Saved Using Coupons and In Store Promotions: $60.83 (44%)

I need to pick up some bananas at some point this week.  They were all very, very green or very, very brown.  (Remember, I'm more of an in the middle kind of girl, not the extremes.)  I also saw a couple good deals at Giant Eagle, so if we have time, we may pop in there later this week, too.

What deals did you find on your weekly shopping trip?

Sunday, January 29, 2012

Meal Plan Jan 30 - Feb 5


One of the best things I've done in my kitchen over the years is to meal plan! Having a plan written down makes that "witching hour" of 4:30-6 pm go so much more smoothly. Do we always follow the plan down to each detail? No, not always. Sometimes what I plan on Sunday to eat on Thursday isn't what I feel like fixing come Thursday. Or we might have a change in plans that will not allow for me to make what's on the menu. Or I might forget to get the meat out of the freezer in time to thaw. But it's a start, and that's what matters most. A plan is a very good thing to have!


Menu planning was quick and easy this week because I have been using a monthly calendar to plot out the meals I have in mind based upon what we have on hand in our pantry and freezer.  We had a few changes in our menu plan last week at the last minute due to schedule changes and a key missing ingredient in the pantry, so the Spaghetti Soup and the Ham and Potato Soup are making a repeat appearance on this week's menu. We also ended up going out to eat on Sunday night for a Family Date to Texas Roadhouse, so we'll be having macaroni and cheese this week on Kids' Pick Night.  This Saturday, Feb 4, is National Nutella Day (can't remember where I read that one), so we'll be celebrating with a special breakfast on Saturday morning.

Here’s what we’ll be having on our table this week:

Crock Pot Monday – Ham and Potato Soup, Salad, rolls (from freezer), strawberry pretzel dessert
One Dish Tuesday – Baked Ziti, salad, bread with dipping oil
Sandwich Wednesday – Chipotle inspired burritos, salad
Kids' Pick Thursday – Spiral Cut Ham, macaroni and cheese, green beans, blueberry sundaes
Quick Fix Friday – Chili Dogs, veggies and dip, chips
New Recipe Saturday – Strawberry/Nutella Crepes for breakfast, U-Pick Lunch, Date Night Dinner
Sunday Brunch– Apple Pancakes, Bacon
Sunday dinner - Spaghetti Soup, Cheesy Garlic Bread, Salad

For breakfasts this week:
Cereal/toast/bagels, smoothies, hard cooked eggs, sausage balls, ham/potato/egg/cheese breakfast wraps (freezer), yogurt/ homemade granola

For snacks this week:
Cereal, chex mix/trail mix, crackers w/ cream cheese or peanut butter, pretzels w/ cheese cubes, popcorn, pizza bagels, veggies with ranch dip

What's on your menu this week?

Need some further inspiration? Check out some other menu ideas over at I'm an Organizing Junkie where Laura hosts Menu Plan Monday every week.

Thursday, January 26, 2012

Egg Casserole

Looking for a simple egg casserole made from just a few basic ingredients?  This is my standard egg casserole recipe handed down from my mom.  There's nothing fancy about it, but I can tell you that it is always the first pan emptied whenever I take it to a breakfast gathering.  My husband and children love this dish, so we have it fairly often, sometimes even for dinner!  I picked up eggs for just 99 cents/doz last week, a roll of sausage for under $2, and 8 oz of shredded cheddar for just $1.50 making this very budget friendly dish.  It took me about 10 minutes to put this together

Like many other egg casserole recipes, this one should be mixed up a day ahead and then baked on the day you want to eat it.  Our "new" house has a "bake and hold" feature on the oven which is quite handy.  We came home from church on Sunday morning with this delicious brunch dish ready for us when we walked in the door.  It reheats very well, so we enjoyed another breakfast's worth during the week warmed up in the microwave.

Egg Casserole
6 eggs
2 cups milk
1 tsp dried mustard
1 tsp salt
2 or 3 pieces of bread, cubed (I have also used leftover hamburger/hot dog buns)
1 lb sausage, browned and drained (I prefer Bob Evans)
2 cups sharp cheddar cheese, shredded

1.  In a large bowl, beat the eggs.
2.  Whisk in the milk, mustard, and salt.
3.  Fold in the cubed bread, browned sausage, and cheese.
4.  Pour into a greased 9x13 casserole dish.
5.  Cover dish and refrigerate overnight.
6.  The next day, remove cover and bake for 45 minutes at 350.  (The casserole will be bubbly and brown slightly).
7.  Let stand 10 minutes before serving.

We enjoyed this casserole with toast and strawberry rhubarb jam and fresh fruit. (Sorry for the shadow and the table glare.  I took the photo in a hurry as we had hungry children!)


What's your favorite breakfast casserole recipe?

Wednesday, January 25, 2012

Overnight Granola

"I could eat this all day long. . . for all 3 meals and snacks in between!" remarked the 8 year old Cereal Monster when I served up a bowl of this super easy Overnight Granola. 

Overnight Granola

I started experimenting with different granola recipes this summer.   The Cereal Monster gets her love of cereal from her dad.  He starts every day with a bowl full of grain-filled goodness.  He prefers a hearty, nuggety type cereal best (like Grape Nuts or Kashi or granola).  As I read others' recipes at creating low cost, homemade cereals, I thought I'd give it a try.  While they all were tasty, they were a bit too time consuming for my quick and easy meal preferences.

That is. . . until I came across this recipe for a granola that you bake for 10 minutes and then let sit overnight in your oven.  There's no stirring and no worrying that your oats are burning and no setting aside a two hour block in which to bake the granola.   I put together a batch in 5 minutes the other night while I waited for the 11 year old to come back from her violin lesson.  I spread it out on a large cookie sheet, put it in my already warm oven for 10 minutes, turned off the oven when the timer went off, and then let the magic take place.  When we woke up, there was a tray of honey glazed, cinnamony, crunchy, healthy goodness just waiting to be eaten.  It doesn't get any easier than that!

Here's the recipe:

Overnight Granola
7 cups of old fashioned oats
1/2 cup brown sugar
1/2 cup canola oil
1/2 cup honey
2 tsp vanilla
2 tsp cinnamon
1/4 tsp salt

1.  Place the oats in a large mixing bowl.
2.  Combine the brown sugar, oil, and honey in a pyrex measuring cup.
3.  Microwave for 1 min 30 seconds; stir
4.  Add the vanilla and cinnamon to the oil/sugar/honey mixture.
5.  Pour the spiced liquids over the oats and stir until covered; sprinkle with 1/4 tsp salt.
6.  Spread the oats on a parchment lined cookie sheet.
7.  Place cookie sheet in a preheated 375 degree oven.
8.  Turn oven off after 10 minutes.
9.  In the morning, remove pan from oven and break up granola.
10.  Store in airtight container or large ziploc bag.

I think what I liked best about this recipe (besides the ease) was the versatility of these simple oats.  There are all sorts of ways you can customize them to suit your tastes.  Here's an example of how we enjoyed them today at our house:
  • I ate mine with a bowl of Greek yogurt for breakfast.
  • John added nuts, raisins, and M&Ms to make a snack mix to take to work.
  • The big girls each had a big bowl with milk as an afterschool snack.
  • The 3 year old ate hers with a few mini marshmallows while I finished fixing dinner.
  • The 11 year old wants to try some with fresh fruit for breakfast in the morning.
The next time you have your oven going, put together a batch of this granola.  It's fantastic!

How do you like to eat your granola?

Ranchero Beans and Rice

I debated whether or not to post this recipe.  Not because it's not a good one.  It is. . .

But it doesn't photograph well. . . . at all.  I tried taking a picture of it in the pan, in a bowl, on a plate. . . It just didn't look like I wanted it to look.

I think the recipe has merit, however, because it is very inexpensive, made easily with pantry/freezer items in under 10 minutes, and my kids said I could make it again.  That makes it a winner in my book.

When I started following different food/mom bloggers, it seemed that bean and rice recipes were flooding the pages as many of the writers were aiming to become more frugal and financially wise and follow the advice of Dave Ramsay of Financial Peace and the Total Money Makeover.  He advocates the use of cash to avoid debt, building up financial reserves so that you don't have to rely on credit, and living like no one else now so that you can live like no one else later.  He often uses the analogy that you eat beans and rice today so that you can enjoy steak tomorrow.

Well, I'm always looking for ways to be a good steward of all the gifts that God has given me. And it seems that every health article I read suggests increasing the servings of beans in your diet. So, I started looking around on sites for some bean and rice recipes.  I was not interested in making beans and rice a staple of our meals night after night, but I was interested in gathering a few recipes that I thought our family would enjoy.  I first read about this recipe last year on 5dollardinners.com last winter.  Erin actually had a video of her making this dish.  I made it last year, but thought it needed a bit more tweaking to fit our tastes. 

I had the ham leftover from Christmas in the freezer and wanted to find a recipe that would make use of it when I did my menu planning.  The honeybaked ham gave this dish the sweetness that it needed. 

I also have bags of various kinds of beans in my freezer.  Once I got into using beans more regularly in our meals, I started buying them dried, soaking them overnight, and then cooking them in a large batch.  You can freeze the cooked beans in ziploc baggies in smaller amounts.  I find that I use beans more often if I have them readily available, and the cost is significantly less than canned beans. 

The Rotel tomatoes came from my pantry after a great sale last spring.  I think I got them for under 25 cents a piece with my coupon.  My kids like the "mild" version rather than the regular version, but if your family likes the heat, go for the real thing. 

Here's the recipe:

Ranchero Beans and Rice
1 Tbsp olive oil
2-3 Tbsp chopped sweet onion
2 cups chopped ham
1 can pinto beans, rinsed and drained
1 can black beans, rinsed and drained
1 can mild Rotel tomatoes
1 Tbsp brown sugar
1/4 tsp salt

1.  Drizzle the olive oil in a large skillet over medium high heat.
2.  Saute the onion in the olive oil for 2 minutes.
3.  Add the ham and saute for 1 minute.
4.  Add the beans and gently mix.
5.  Pour the can of tomatoes over the top and gently mix.
6.  Continue stirring until warmed through (about 5 minutes).
7.  Sprinkle with brown sugar and salt to taste. (if you use canned beans, you may not need to add any salt)

Serve over brown rice. (The brown rice gives it a sweetness to cut the hot of the Rotel tomatoes and it also gives the beans a nice texture.  I make my rice in a rice cooker, but it also tastes fine over Minute Rice if you need to speed up the prep time.)

We enjoyed our Ranchero Beans over rice with sides of mixed greens and a sweet vinaigrette, cantaloupe/strawberries/green grapes, and leftover beer bread.  Orange creamsicle popsicles were the perfect sweet ending to our family meal.

What's your favorite way to use beans and rice?

Tuesday, January 24, 2012

Make Ahead Snacks - Pizza Bagels

Have you ever thrown these into your cart at the grocery store?
If you're lucky enough to buy them on sale with a coupon, you maybe spent $1.50 on these 9 tiny snack bites.  The box IS luring with this healthy information - "whole grain", "protein", "real cheese".  And don't they just look so yummy? (No, not really but kids like 'em! )

The problem?  This box is not big enough to feed the hungry snackers at my house!  When they were toddlers, yes.  But now that they are growing and bringing their hungry friends over, there's not enough to satisfy their hunger attacks.  Plus the picture on the box always looks much better than the ones I pull from the oven.  And they're sometimes too crunchy or too chewy or too fake tasting.

This past week I had some leftover pizza sauce from our stromboli, so I decided to whip up a new batch of pizza bagel bites myself.  Now we have 18 bagel bites in the freezer just waiting to be devoured by hungry children!  An added bonus - they taste so much better than those frozen ones you buy at the store!

When hunger strikes, just pull one or two or more bagels from the bag in the freezer, place on a baking sheet, and bake for 5-7 min at 350.  We like to do ours in the toaster oven because they cook super fast.  Just watch so they don't get too brown on top. 

This particular batch is just cheese, but you could certainly put whatever pizza toppings you like on them.

These took me about 5-10 minutes to put together; an hour to freeze, and less than 5 minutes to bag and refreeze for later use.

Here's how you make 'em:

Ingredients:
1 bag of your favorite brand bagels (I used whole grain white)
1 1/2 cups of your favorite pizza sauce (leftover spaghetti sauce will work too)
1 1/2 cups of shredded mozzarella or pizza blend cheese

Step by step instructions:
1.  Open the bagels and place on a large cookie sheet.
2.  Spread some sauce on all the bagel halves.  (Sometimes I sprinkle a little extra italian seasoning or oregano on top if I'm using spaghetti sauce instead of pizza sauce)
3.  Top with shredded cheese. 
4.  Place cookie sheet in the freezer for an hour or so.
5.  Place the frozen bagels in a large ziploc bag.  Separate the layers with a piece of wax or parchment paper to keep them from sticking together.
6.  To eat, pull out frozen bagel(s).  Place on baking sheet.  Bake for 5-7 min @ 350 in a toaster oven.  (may need to do a bit higher in a real oven)

Whole grain bagel, heart healthy pizza sauce, and low fat mozzarella cheese. . . .

Make a batch of these tasty snacks this week for your family! 

What's your favorite make ahead snack?

Monday, January 23, 2012

Menu Plan Jan 23-29


One of the best things I've done in my kitchen over the years is to meal plan! Having a plan written down makes that "witching hour" of 4:30-6 pm go so much more smoothly. Do we always follow the plan down to each detail? No, not always. Sometimes what I plan on Sunday to eat on Thursday isn't what I feel like fixing come Thursday. Or we might have a change in plans that will not allow for me to make what's on the menu. Or I might forget to get the meat out of the freezer in time to thaw. But it's a start, and that's what matters most. A plan is a very good thing to have! 

Menu planning was quick and easy this week because I have been using a monthly calendar to plot out the meals I have in mind based upon what we have on hand in our pantry and freezer.  I took a quick look at our family calendar and made sure that the meal preps would work with our schedule, added in some fresh fruit and veggie/salad sides from my weekly trip to the grocery store, and we’re all set.  Saturday dinner is up in the air, as we have a slew of kids' activities going on at the same time and we're not exactly sure how that's all going to come together yet. 
Here’s what we’ll be having on our table this week:
Crock Pot MondayHoney Garlic Chicken, rice, edemame, salad (the 8 year old's student teacher from last year is coming over for dinner)
One Dish Tuesday Ranchero Beans and Rice, salad, frozen lime mint salad
Sandwich Wednesday – Spaghetti Soup, salad, Cheesy Garlic Bread, Salad, Peaches (from freezer)
Kids' Pick Thursday – Crispy Oven Fried Chicken, potatoes, peas, salad, fruit
Quick Fix Friday – Ham and Potato Soup, salad, wheat rolls (from freezer), strawberry pretzel dessert
Saturday – U-Pick Lunch (leftover buffet), Dinner on the go
Sunday Brunch– Baked Oatmeal with blueberries, ham slices (from freezer)
Sunday dinner - Salmon patties, macaroni and cheese, broccoli slaw

For breakfasts this week:
Cereal/toast/bagels, smoothies, ginger maple pancakes (freezer), hard cooked eggs, oatmeal with fruit, ham/potato/egg/cheese breakfast wraps (freezer), yogurt/granola
For snacks this week:
Cereal, chex mix/trail mix, crackers w/ cream cheese or peanut butter, pretzels w/ cheese cubes, popcorn, pizza bagels

What's on your menu this week?

Need some further inspiration? Check out some other menu ideas over at I'm an Organizing Junkie where Laura hosts Menu Plan Monday every week.

Sunday, January 22, 2012

Spinach Salad and Beer Bread

John had a limited vegetable pallet when I first met him.  Nonetheless, he was raised right by his mom, because he always ate whatever I served on his plate when he came over for dinner during our early dating days.  His face was a bit apprehensive, however, when I laid down a large bowl of my favorite spinach salad one night as our main dish.

Spinach Salad

"Just try it," I said.  "It's the same salad they serve at this restaurant where my parents used to go for all their big celebrations. (The Red Geranium in New Harmony, IN)  It's really good!  It's one of my mom's best recipes!"

Lucky for me, he was enticed by the bacon on top.  And he was hungry.  And he had nothing to eat back at his own apartment.  Plus, what's not to like about a salad with fresh cooked, real bacon on top?

Well, he tried it, and fell instantly in love with the combination of tender spinach, salty bacon, and the sweet and tangy tomato dressing.  Now when people ask him what his favorite vegetable is, he almost always says "Jill's spinach salad".

There is nothing too tricky about this salad.  The dressing has to be made in a blender, however.  I have not had good luck getting it to come together the way it should any other way.  One recipe makes enough to use for at least one bag of spinach or maybe even two.  The thick dressing has a rich and tangy flavor, so it doesn't take too much drizzled over the top to make it a yummy salad.  Sometimes I'll make a batch when I'm in the mood for the salad and then just pick up the spinach and bacon on my next trip to the store. 

We like to enjoy this hearty salad as a light dinner, or sometimes I'll fix a smaller version to go with our main dish.  Tonight we enjoyed the salad with fresh hot slices of homemade beer bread and cantaloupe.  This simple, summer-type meal was the perfect reminder on this damp day that warm, summer weather will return before too long. 

Here's the recipe for the dressing:

Red Geranium Spinach Salad Dressing
1 cup canola oil
3/4 cup sugar
1/3 cup ketchup
1/4 cup vinegar
1 Tbsp Worcestershire sauce
1/2 tsp onion powder
1 tsp salt

Place all ingredients in a blender and blend until all the sugar crystals are dissolved. 

Store in the refrigerator and shake well before serving over a bed of spinach topped with chopped bacon and diced hard cooked eggs.  You can also add fresh mushrooms and croutons, but we like it with just the spinach, bacon, and eggs.

tender spinach, salty bacon, hard cooked eggs, sweet and tangy dressing
This is the salad that will turn even the pickiest eater into liking spinach!


When John and I lived in Madison, Wisconsin, we loved visiting the enormous farmers' market held in the Capitol Square downtown.  One of our favorite purchases was a loaf a homemade beer bread.  We've never found another bread that tasted as good as that baker's, but this one is pretty good.  It is a dense bread with a crunchy outside.  Slice it thick and slather on a little butter.  The 11 year old loves to have a piece leftover for breakfast, lightly toasted.

Homemade Beer Bread
Homemade Beer Bread                                               
3 cups white whole wheat flour
4 1/2 tsp baking powder
1 1/2 tsp salt
1/3 cup brown sugar
1 bottle of beer (12 oz)    (I used Bud Light)

1.  Preheat oven to 350.
2.  In a large bowl, combine the dry ingredients.
3.  Pour in the beer over the top.
4.  Stir until all the ingredients are moistened.  (the batter will be really thick and stiff)
5.  Spread into a greased loaf pan.
6.  Bake for 50-55 minutes until an inserted toothpick comes out clean.

How do you like to eat your spinach?

Saturday, January 21, 2012

Chocolate Banana Snack Cake

Do you ever buy a big bunch of bananas on your weekly shopping trip with good intentions to eat them all only to be left with a one or two yucky ones by the end of the week that no one will eat?  You may know that you can make banana bread with those yucky bananas, but it also takes more than one banana to make a batch of bread.  So what do you do with the one banana?

Come on!  You know the answer - Toss it into the freezer, peel and all!  When you get three or more gathered, you can defrost them and then make them into your favorite baked banana treat. 

I usually have a small stash of bananas in our kitchen freezer.  While I have a old standby recipe for banana bread that we all love, I'm always on the lookout for a new recipe that we might like to change things up a bit.  I love the way banana baked goods make the whole house smell so deliciously inviting.

I remembered this post for Black Bottom Chocolate Cake from one of my favorite food/mom bloggers who writes Mom on a Mission for Christ.  She is a busy mom who has turned her passion for cooking and using her freezer as a key component in her meal planning into a ministry of sharing her food with those in need.  Her recipes that I have tried have all turned out quite good, and I love her humility in her writing about what God has called her to do at this point in her life.  You should check out her blog.  You'll be inspired too.

Anyways, Friday afternoon I had one black banana staring at me on the counter, and I knew I had a few others in the freezer.  So, I decided to put together this chocolate banana snack cake for our dessert and/or snack throughout the weekend.

It came together in about 5 minutes, baked in 30, and will probably be gone by the time I finish writing this post!  We ate the whole first row fresh out of the oven and we only stopped eating because it was time for John and the oldest to head out the door to basketball practice.  We had several more pieces after dinner, John had a piece with his 2nd cup of morning coffee, I grabbed a piece on the way home from the 8year old gymnast's Open Gym time, and I think I heard the rattling of the cover just a few minutes ago.

Try this one with your next batch of yucky bananas.  There's nothing yucky about this cake at all!  In fact, I just may hide the bananas currently on the counter so they don't have the opportunity to get eaten this week.  It's that good!

Chocolate Banana Snack Cake

If you use your bananas in the freezer, they will look absolutely inedible when you dump them from their thawed skins into the mixing bowl.  They may look like they've separated into a liquid and a solid portion.  Don't worrry.  They'll be fine.  Trust me.

Here's the recipe:

Chocolate Banana Cake
1 stick softened butter
1 cup sugar
1 egg
1 tsp vanilla
3 yucky bananas, mashed
1 1/2 cups white whole wheat flour
1 tsp baking powder
1 tsp baking soda
1/2 tsp salt
1/4 cup baking cocoa
1/2 cup choc chips

1.  In mixing bowl, beat the bananas.  (I used my hand mixer, but you could as easily use a Kitchen Aid if yours is out on the counter.)
2.  Add softened butter and sugar and continue to mix well.
3.  Add egg and vanilla and beat until it's all mixed together.
4.  Add in the flour, baking powder, soda, and salt to the creamed mixture.
5.  Take half the batter and put it in a smaller bowl.  Add the cocoa to that batter and mix well.
6.  Spread the chocolate batter into the bottom of a greased 9x13 pan. (It will look like a thin layer; don't worry; they're more like a typical brownie in height than a piece of cake)
7.  Spread the remaining banana batter on top, swirling gently with a butter knife if you like the marbled look of a cake.
8.  Sprinkle the chocolate chips on top.
9.  Bake for 30 minutes at 350 until a toothpick inserted in the middle comes out clean.

What do you do with your yucky bananas?

Need some banana inspiration?  Check out the ideas over at Eat At Home, Ingredient Spotlight Bananas.

Weekly Shopping Trip

After my big produce haul last week, the frig still had quite a few good things left to eat inside of it.  My freezer stash is dwindling slowly thanks to careful meal planning.  Checking the sale ads this week, there were not a ton of instore specials and coupon deals that I had to rush right out and snag but I did want to stock up on some of the Cereal Monster's favorite cereals that were on sale.  We also needed some cheese and deli meats for sandwiches for the weekend and the week.  I also wanted to do a bit of batch cooking for our breakfasts and snacks and picked up the needed ingredients for those items.

With list in hand, cash in wallet, coupons gathered, the three year old with her penny and a snack, we headed off to run our errands on Friday morning.  Here's the haul for the week. 

The 3 year old picked out the orange creamsicle treats despite the
fact that it was freezing outside!  Perfect for our hamburger night!
Here are a few of the best deals I found: 
*Greek Yogurt (Mgr Spec) for .25
*Free Bread with in store promotion on Hormel deli meat, $1.63 meat with sale price & coupon
*Cinnamon Toast Crunch with in store promotion and coupon, $1 X 2
*8 lbs potatoes - $2.50
*Meijer Eggs - .99 x 3
*Meijer Tortillas - $1.33 x 2
*Grapes - .99/lb
*TN Pride Sausage - $1.30 with in store promotion and coupon
*Valentines, socks for Undy Sunday @
church, and snow gloves for 11 year old - $15.76


Total Spent: $85.78
Total Saved using in store promotions and coupons: $89.64

Not too bad.  I did pop into Aldi and pick up 2 bags of mini bagels, foil, chili powder, and baggies which did not get added into this total.

What bargains did you find on your weekly shopping trip?

When a New Recipe is a Bust!

I love trying out new recipes.  In fact, the first year John and I dated, he put on about 20 pounds.  He was a poor, hungry graduate student, and I had a whole slew of recipes that I had been collecting from magazines and books in the first year I lived on my own.  I loved having him come over to my place for dinner.  I didn't make the same thing for him twice in that whole first year.  He developed some favorites that I repeat for him, but we still are frequently trying something new on our table.

I thought I had come to a point where I can just sort of read a recipe and know if will work out or not for the tastes of my eaters.  I also thought I had come to the point where I can adapt the recipe on the spot if it needs just a little tweaking to suit our likes (like cutting down on the amount of onion or omitting the green pepper).

Last Saturday I had a full crockpot of 21 Ingredient Chili cooking away all day.  Snow was gently falling outside, the girls were happily playing with each other, John and I had a movie night date to look forward to after dinner. (the real kind of movie date night, at the movie theater, while a babysitter puts the kids to bed at home)  I had gathered this recipe from Stephanie O'Dea's popular blog, A Year of Slow Cooking.  She had received the recipe from a reader and gave rave reviews about it when she made it herself.  It sounded like something my family would like, too, and I had all the ingredients on hand.  I had high hopes for this dinner.

About 4:30 or so as the smells were filling the house and making my mouth water, I decided to take just a taste of the chili.  WHOA MAMA!!!!  THAT CHILI IS HOT, HOT, HOT!  I gave John a taste.  He swallowed.  His eyes bugged out a bit.  There was no way our kids would eat this for dinner.  What were we going to do? 

John lovingly looked up a few hints on what to do if your chili is too spicy on his Blackberry (remember we were without Internet last weekend).   I added some brown sugar (the chili had a sweet undertone with some honey already in the recipe) and sliced up a potato.  I thought maybe with some sour cream and cheese, it would be okay.

At the dinner table, the kids gave their best effort to try it.  Even with the added sugar, the sour cream, the cheese, and some chips. . .. it was still way too spicy hot.  Luckily I had made a ham earlier in the day, so the kids had ham.  John said he would eat it, but I didn't need to make it again. . . . . ever.

On a lighter note. . .

I tried another new recipe that same night for a cornbread from Melissa D'Arabian, The Ten Dollar Dinners Food Network star.  I made a few changes from her original recipe, and the kids and John gave this new recipe rave reviews.  In fact, they said I can toss my old corn bread recipe out the window (no more Jiffy mix, I guess!)

I did not get pictures, because I was too flustered about my way too hot chili dinner.  You can check out the pictures on the Food Network site.  Mine looked about the same.

Here's the recipe as I fixed it:

Sweet Cornbread
1 cup flour
3/4 up cornmeal
2 Tbsp brown sugar
2 tsp baking powder
1/2 tsp salt
2 eggs
3/4 cup milk
3 Tbsp butter, melted
1/2 cup applesauce
2 Tbsp honey

1.  Preheat oven to 400.
2.  In a medium bowl, whisk together the dry ingredients.
3.  In another medium bowl, wisk together the wet ingredients.
4.  Pour the wet ingredients into the dry ingredients and stir to mix together; do not overmix or you'll get tough cornbread.
5.  Pour batter into a greased 9x9 baking dish.
6.  Bake for 25 minutes or until an inserted toothpick comes out clean.

Serve warm with butter and honey.

This is more cakelike than a traditional cornbread, but it was superb!  The sweetness was a perfect accompaniment to the spicy dinner.  The kids loved it leftover the next day, too.

What do you do when a recipe is a bust?

Thursday, January 19, 2012

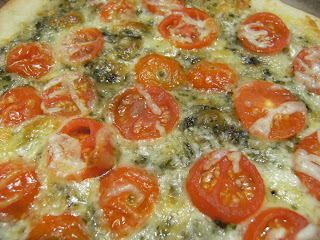
Fresh Tomato Pesto Pizza

Last week at Meijer, I picked up two containers of FREE cherry tomatoes by combining a weekly special with a coupon.  We used the first container of tomatoes on our salads all week, but I had that second container still sitting on the counter just waiting to be created into something budget friendly, easy to fix, and a family favorite.

I received a post from The Pioneer Woman Cooks on tomato bruschetta that inspired me to create a similar dish for our dinner last Friday night.  I saw a picture of the very same little cherry tomatoes on her counter that were sitting on mine.  She chose to use her tomatoes to make bruschetta.  I chose to use mine for a fresh tomato pesto pizza.

Sweet basil, robust garlic, tender tomatoes, ooey gooey cheese. . . .yum


The result?  A light dinner that was perfect for our on the go sports night between basketball practice and gymnastics team practice for the two big girls.  It was like a taste of summer in the depth of the January cold.  The best parts?  It cost under $3, came together in about 20 minutes, and everyone ate it without complaining! 

My mom had a big harvest of fresh basil this past fall and she brought down a huge bunch of it when they came to visit in October.  It was way too much to use up fresh, so we did the next best thing.  We whipped up a batch of pesto with some olive oil, parmesan cheese, and garlic.  Then we divided up the pesto into smaller freezer containers so we could enjoy that fresh made taste throughout the year.  I'd need about 1/2 cup to make the base for our pizza. 

Here's the other ingredients gathered on the counter, ready for recipe creation.  (I forgot to put the pesto container on the counter before taking the picture.) 


I chose to make my own pizza crust this time, but you could use a premade crust, a refrigerated roll out pizza crust, a loaf of frozen bread dough, or even tortillas or pita breads.  Over the years, I've used all of these for pizza crusts depending what I had on hand or what I could get for very low cost using store specials and/or coupons.  I also chose to use a mix of white and wheat flour this time in the crust and the results were quite good.

After you have your crust rolled out on the pan, spread a thin layer of pesto over the top.  Sprinkle with a little kosher salt and pepper to bring out the flavors.  Layer on your sliced tomatoes, top with cheese, and you're ready to go.  (You could also add chicken; we just didn't have any leftover because the kids ate so much of the shredded chicken earlier in the week!)


Bake in a preheated 425 degree oven for about 12-15 minutes or until bubbly.  Let stand a few minutes before cutting.  Serve with a plate that is 2/3 full of fruits and vegetables for a well balanced meal.

Individual Blueberry Trifles

October is birthday season at our house!  The 3 year old, 8 year old, and I all have our birthdays within 5 days.  We have separate celebrations for each of us, so that can be a lot of cake to consume at one time.  What do I do with all that cake?  You should know the answer by now even though you’ve only been reading the blog for a couple of weeks. . . . I throw some of it in the freezer to be enjoyed later!

So, I came across a small pan of unfrosted white cake in the freezer during the freezer inventory.  I had cut 4 small circles out of the cake to make the 3 year old's pink princess castle cake.  (The cake rounds were the base for the turrets on the castle.)  I figured the remainder of the cake could be used for a trifle or strawberry shortcake or something in the future, so I tossed it in the freezer.

We had a pork roast on Sunday for dinner.  I thought that simple meal needed a little happy ending, so I whipped up a batch of these heavenly individual blueberry cake trifles.  I have several bags of blueberries in the freezer (my parents live in the heart of Michigan blueberry country).  I used two cups to turn into a sweet topping for the cake and added some cool whip.  The only problem. . . . they weren’t big enough!  We all were scraping the dishes trying to get that last bit of sweet blueberry goodness!

Individual Blueberry Trifle


Here’s the recipe for the blueberry topping, the only real cooking I had to do.  It came together in under 5 minutes:


Blueberry Topping

2 cups frozen blueberries
1/3 cup sugar
1 tbsp corn starch
1 Tbsp lemon juice

Combine all the ingredients in a small saucepan.  Stir and heat over medium heat until the bubbling.  Cook for one minute to thicken.  Cool before putting on top of the trifles.  (This is also delicious over vanilla ice cream!)


Individual Blueberry Trifles

White cake, cut into cubes (I had about a half of a 9x9 pan of cake)
Blueberry topping (you could also use any can of pie filling or thicken any fruit you might have)
½ carton of Light Cool Whip

1.  Put a few cubes of cake in the bottom of a parfait glass.
2.  Spoon a blob of blueberry topping on top.
3.  Add a spoonful of cool whip.
4.  Repeat layers.
5.  Place in the frig until you’re ready to eat. 

What do you do with leftover cake?